Friday, October 21, 2011
Using the ASP.NET AJAX ModalPopup in an ASP.NET 3.5 application
When developing an ASP.NET application, one important aspect that is difficult to code against is stopping users clicking controls on a page when they have already submitted a request. There are several ways to do this, the most common being a JavaScript function to disable control elements after an event has been raised. Thankfully this task is a lot easier thanks to the Ajax Control Toolkit and the ModalPopup control. The Ajax Control Toolkit is a separate download that is built on top of the Microsoft ASP.NET Ajax framework. The toolkit allows you to create extenders and controls to enhance the current ASP.NET server controls.
The toolkit can be downloaded from http://tinyurl.com/ajax-toolkit. Information on how to install the toolkit can be found athttp://tinyurl.com/toolkit-info.
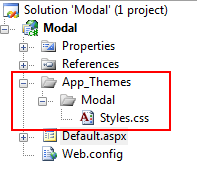
Let’s write some code. Open Visual Studio 2008 and choose File > New > Web > ASP.NET Web Application. Because the ModalPopup uses cascading style, I’m adding an ASP.NET Theme folder to the project. Right click the project and choose Add > Add ASP.NET Folder > Theme. Name the theme ‘Modal’. Under the theme add a new cascading style sheet. Your project should look like the following:
Open the Styles.css file and add the following code:
.modalBackground
{
background-color: Yellow;
filter: alpha(opacity=60);
opacity: 0.6;
}
.modalPopup
{
background-color:#ffffdd;
border-width:3px;
border-style:solid;
border-color:Gray;
padding:5px;
width: 350px;
height:300px;
}
The classes above will be used to style the ModalPopup control. For the theme to be available to the project, you need to update the web.config file with the following code:
<pages theme="Modal">
This instructs the website to use the Modal theme throughout the website. This is a simple way to centrally manage styles in a website.
The next step is to add a reference to the Microsoft Ajax Control Toolkit. To do this right click on the Toolbox and select Choose Items. The following dialog box will appear:
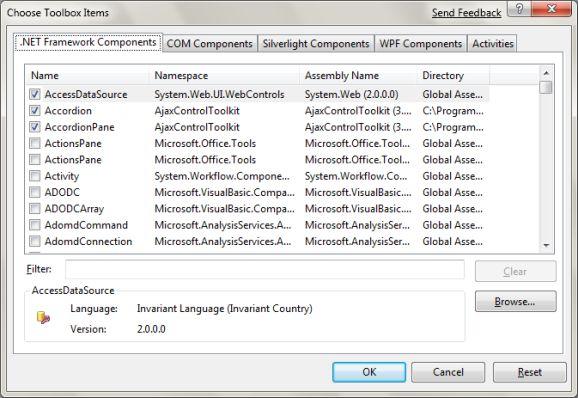
Browse to where you have installed the Microsoft Ajax Control Toolkit and click OK. This will add the Microsoft Ajax Control Toolkit to the Toolbox.
Open the Default.aspx page. Add the following code to the page:
<asp:ScriptManager ID="ScriptManager1" runat="server" />
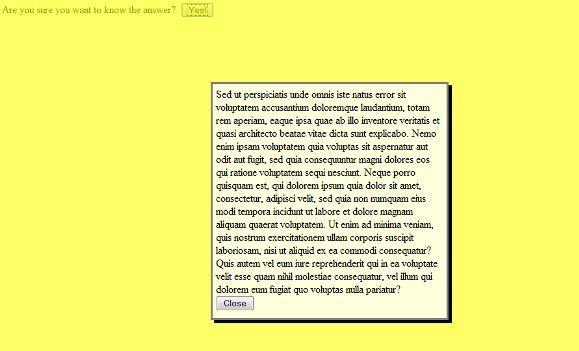
Are you sure you want to know the answer?.
<asp:Button ID="btnYes" runat="server" Text="Yes!" />
<br />
<asp:Panel ID="pnlModal" runat="server" CssClass="modalPopup">
Sed ut perspiciatis unde omnis iste natus error sit voluptatem accusantium doloremque
laudantium, totam rem aperiam, eaque ipsa quae ab illo inventore veritatis et quasi
architecto beatae vitae dicta sunt explicabo. Nemo enim ipsam voluptatem quia voluptas
sit aspernatur aut odit aut fugit, sed quia consequuntur magni dolores eos qui ratione
voluptatem sequi nesciunt. Neque porro quisquam est, qui dolorem ipsum quia dolor
sit amet, consectetur, adipisci velit, sed quia non numquam eius modi tempora incidunt
ut labore et dolore magnam aliquam quaerat voluptatem. Ut enim ad minima veniam,
quis nostrum exercitationem ullam corporis suscipit laboriosam, nisi ut aliquid
ex ea commodi consequatur? Quis autem vel eum iure reprehenderit qui in ea voluptate
velit esse quam nihil molestiae consequatur, vel illum qui dolorem eum fugiat quo
voluptas nulla pariatur?
<br />
<asp:Button ID="btnClose" runat="server" Text="Close" />
</asp:Panel>
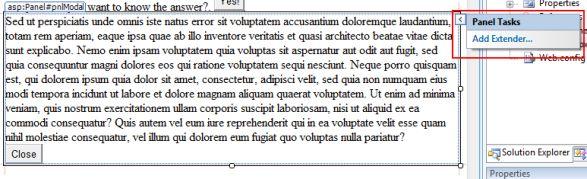
For any of the toolkit controls to work, the page must contain a ScriptManager control. The ScriptManager manages client scripts for ASP.NET Ajax pages. Switch to the design view for the page. By hovering your mouse over the Panel control, you’ll see the smart tag appear. Click the smart tag and choose Add Extender:
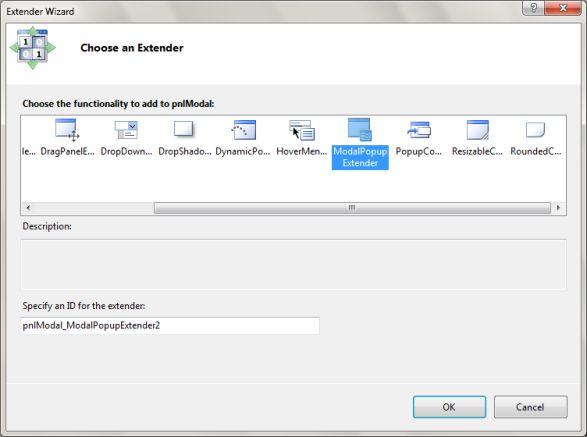
A new dialog will appear with the list of extenders that are available in the toolkit. Select ModalPopup Extender:
This will add the following code to the Panel control:
<asp:ModalPopupExtender TargetControlID="btnYes" ID="pnlModal_ModalPopupExtender"
runat="server" DynamicServicePath="" Enabled="True" BackgroundCssClass="modalBackground"
PopupControlID="pnlModal" CancelControlID="btnClose" DropShadow="true">
</asp:ModalPopupExtender>
The properties that must be configured are:
· PopupControlID – The ID of the control that will be displayed as modal popup
· TargetControlID – The ID of the control that activates the modal popup
· CancelControlID – The ID of the control that cancels the modal popup
· BackgroundCssClass - The CSS class to apply to the background when the modal popup is displayed
The code is almost complete. The last thing you need to do is ensure the Panel control that is being used as the modal popup is hidden until the user clicks the Yes! button. Update the Panel control with the following code:
<asp:Panel ID="pnlModal" runat="server" CssClass="modalPopup" Style="display: none;">
The hard work is done. Run the website and when you click on the button to answer the question, a modal popup will appear, disabling the controls in the background.
The ModalPopup is a great way to stop users clicking on controls when you don’t want them to. It provides greater control, which in turn will lead to increased accuracy and integrity of the data captured. The source code of this article can be downloaded from here. To see how to use the ModalPopup in a Master-Detail GridView scenario, take a look at this article by Suprotim Display Master-Detail Data with the ModalPopup Extender and GridView
