Thursday, December 15, 2022

A28 Combo App Studio


Privacy Policy

A28 Combo App Studio built the A28 Combo App Studio app as an Ad Supported app. This SERVICE is provided by A28 Combo App Studio at no cost and is intended for use as is.


This page is used to inform visitors regarding my policies with the collection, use, and disclosure of Personal Information if anyone decided to use my Service.


If you choose to use my Service, then you agree to the collection and use of information in relation to this policy. The Personal Information that I collect is used for providing and improving the Service. I will not use or share your information with anyone except as described in this Privacy Policy.


The terms used in this Privacy Policy have the same meanings as in our Terms and Conditions, which are accessible at A28 Combo App Studio unless otherwise defined in this Privacy Policy.


Information Collection and Use


For a better experience, while using our Service, I may require you to provide us with certain personally identifiable information, including but not limited to A28 Combo App Studio. The information that I request will be retained on your device and is not collected by me in any way.


The app does use third-party services that may collect information used to identify you.


Link to the privacy policy of third-party service providers used by the app


Google Play Services

AdMob

Google Analytics for Firebase

Firebase Crashlytics

Log Data


I want to inform you that whenever you use my Service, in a case of an error in the app I collect data and information (through third-party products) on your phone called Log Data. This Log Data may include information such as your device Internet Protocol (“IP”) address, device name, operating system version, the configuration of the app when utilizing my Service, the time and date of your use of the Service, and other statistics.


Cookies


Cookies are files with a small amount of data that are commonly used as anonymous unique identifiers. These are sent to your browser from the websites that you visit and are stored on your device's internal memory.


This Service does not use these “cookies” explicitly. However, the app may use third-party code and libraries that use “cookies” to collect information and improve their services. You have the option to either accept or refuse these cookies and know when a cookie is being sent to your device. If you choose to refuse our cookies, you may not be able to use some portions of this Service.


Service Providers


I may employ third-party companies and individuals due to the following reasons:


To facilitate our Service;

To provide the Service on our behalf;

To perform Service-related services; or

To assist us in analyzing how our Service is used.

I want to inform users of this Service that these third parties have access to their Personal Information. The reason is to perform the tasks assigned to them on our behalf. However, they are obligated not to disclose or use the information for any other purpose.


Security


I value your trust in providing us your Personal Information, thus we are striving to use commercially acceptable means of protecting it. But remember that no method of transmission over the internet, or method of electronic storage is 100% secure and reliable, and I cannot guarantee its absolute security.


Links to Other Sites


This Service may contain links to other sites. If you click on a third-party link, you will be directed to that site. Note that these external sites are not operated by me. Therefore, I strongly advise you to review the Privacy Policy of these websites. I have no control over and assume no responsibility for the content, privacy policies, or practices of any third-party sites or services.


Children’s Privacy


These Services do not address anyone under the age of 13. I do not knowingly collect personally identifiable information from children under 13 years of age. In the case I discover that a child under 13 has provided me with personal information, I immediately delete this from our servers. If you are a parent or guardian and you are aware that your child has provided us with personal information, please contact me so that I will be able to do the necessary actions.


Changes to This Privacy Policy


I may update our Privacy Policy from time to time. Thus, you are advised to review this page periodically for any changes. I will notify you of any changes by posting the new Privacy Policy on this page.


This policy is effective as of 2022-12-15


Contact Us


If you have any questions or suggestions about my Privacy Policy, do not hesitate to contact me at dil.kakadiya@gmail.com.

3:58 AM by Dilip kakadiya · 0

Monday, April 1, 2019

How to make Crud operation In Angular 5.2 With .Net Core 2.1 using Entity Framework Core

Introduction

  1. Angular Project Introduction
  2. Installation
  3. Database
  4. Create MVC Web Application
  5. Adding Model in to the Application
  6. Adding the Web API Controller to the Application
  7. Create the Angular Service
  8. Creating Angular Components
  9. Defining route and navigation menu for our Application
  10. Run your application

Angular Project Introduction

In this article, we are going to create a web application using ASP.NET Core 2.1 and Angular 5 with the help of Entity Framework Core database first approach.
we are using Angular Forms with required field validations on the client side.

Installation

  • Install .NET Core 2.1 or above SDK from here.
  • Install the latest version of Visual Studio 2017 Community Edition from here.
  • Download and install the latest version of Node.js from here..
  • SQL Server 2008 or above


Database

Create one database name like CRUD_Angular5_core2 Create two table
CREATE TABLE tblEmployee (  
EmployeeID int IDENTITY(1,1) NOT NULL PRIMARY KEY,  
Name varchar(20) NOT NULL ,  
City varchar(20) NOT NULL ,  
Department varchar(20) NOT NULL ,  
Gender varchar(6) NOT NULL   
)  
GO  
 
CREATE TABLE tblCities (  
CityID int IDENTITY(1,1) NOT NULL PRIMARY KEY,  
CityName varchar(20) NOT NULL   
)  
GO  


Now, we will put some data into the tblCities table. We will be using this table to bind a dropdown list in our web application from which the desired city can be selected. Use the following insert statements.
INSERT INTO tblCities VALUES('Surat');  
INSERT INTO tblCities VALUES('Mumbai');  
INSERT INTO tblCities VALUES('Amreli');  
INSERT INTO tblCities VALUES('Vadodara');  
INSERT INTO tblCities VALUES(‘Bharuch’);  


Create MVC Web Application

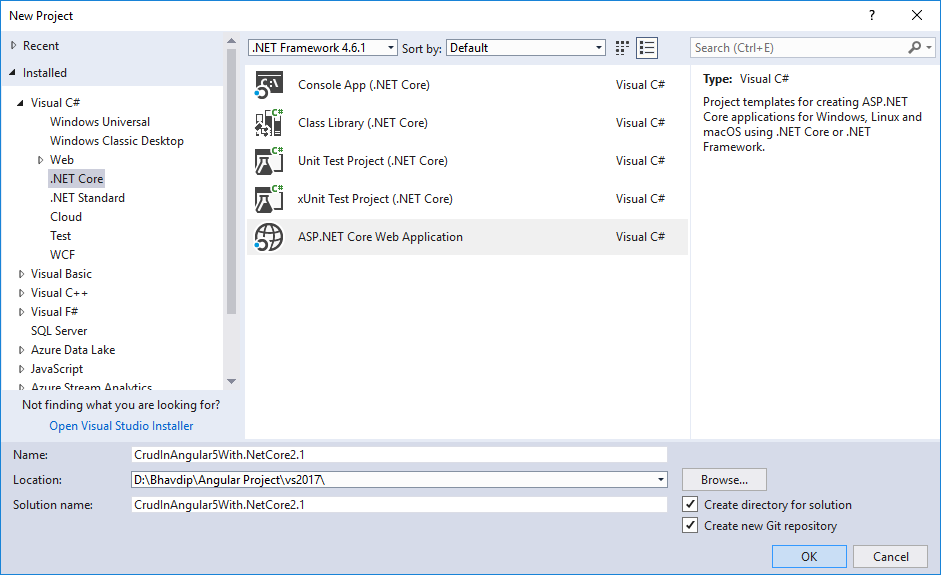
  • Open Visual Studio and select File >> New >> Project.

  • After selecting the project, a "New Project" dialog will open. Select .NET Core inside Visual C# menu from the left panel.

  • Then, select “ASP.NET Core Web Application” from available project types. Put the name of the project as CrudInAngular5With.NetCore2.1 and press OK.

  • After clicking on OK, a new dialog will open asking you to select the project template. You can observe two drop-down menus at the top left of the template window. Select “.NET Core” and “ASP.NET Core 2” from these dropdowns. Then, select “Angular” template and press OK.
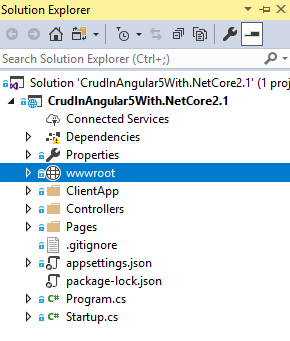
  • Now, our project will be created. You can observe the folder structure in Solution Explorer as shown in the below image.

Adding the Model to the Application

  • We are using Entity Framework core database first approach to create our models. Navigate to Tools >> NuGet Package Manager >> Package Manager Console.
  • We have to install the package for the database provider that we are targeting which is SQL Server in this case. Hence run the following command:


  1. Install-Package Microsoft.EntityFrameworkCore.Tools -Version 2.1.1
  2. Install-Package Microsoft.EntityFrameworkCore.Tools -Version 2.1.1


After you have installed both the packages, we will scaffold our model from the database tables using the following command:


Scaffold-DbContext "Your connection string here" Microsoft.EntityFrameworkCore.SqlServer -OutputDir Models
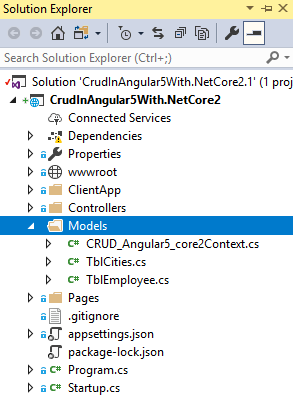
Do not forget to put your own connection string (inside " "). After this command gets executed successfully you can observe a Models folder has been created and it contains three class files CRUD_Angular5_core2Context.cs, TblCities.cs and TblEmployee.cs. And hence we have successfully created our Models using EF core database first approach.
Now, we will create one more class file to handle database related operations
Right click on Models folder and select Add >> Class. Name your class EmployeeDataAccessLayer.cs and click Add button. At this point of time, the Models folder will have the following structure.
Open EmployeeDataAccessLayer.cs and put the following code to handle database operations.


using Microsoft.EntityFrameworkCore;  
using System;  
using System.Collections.Generic;  
using System.Linq;  
using System.Threading.Tasks;  
 
namespace CrudInAngular5With.NetCore2.Models  
{  
   public class EmployeeDataAccessLayer  
   {
       CRUD_Angular5_core2Context db = new CRUD_Angular5_core2Context();  
 
       public IEnumerable GetAllEmployees()  
       {
           try  
           {
               return db.TblEmployee.ToList();  
           }
           catch  
           {
               throw;  
           }
       }
 
       //To Add new employee record   
       public int AddEmployee(TblEmployee employee)  
       {
           try  
           {
               db.TblEmployee.Add(employee);  
               db.SaveChanges();  
               return 1;  
           }
           catch  
           {
               throw;  
           }
       }
 
       //To Update the records of a particluar employee  
       public int UpdateEmployee(TblEmployee employee)  
       {
           try  
           {
               db.Entry(employee).State = EntityState.Modified;  
               db.SaveChanges();  
 
               return 1;  
           }
           catch  
           {
               throw;  
           }
       }
 
       //Get the details of a particular employee  
       public TblEmployee GetEmployeeData(int id)  
       {
           try  
           {
               TblEmployee employee = db.TblEmployee.Find(id);  
               return employee;  
           }
           catch  
           {
               throw;  
           }
       }
 
       //To Delete the record of a particular employee  
       public int DeleteEmployee(int id)  
       {
           try  
           {
               TblEmployee emp = db.TblEmployee.Find(id);  
               db.TblEmployee.Remove(emp);  
               db.SaveChanges();  
               return 1;  
           }
           catch  
           {
               throw;  
           }
       }
 
       //To Get the list of Cities  
       public List GetCities()  
       {
           List lstCity = new List();  
           lstCity = (from CityList in db.TblCities select CityList).ToList();  
 
           return lstCity;  
       }
   }
}  

Adding the Web API Controller to the Application

Right click on Controllers folder and select Add >> New Item.
An “Add New Item” dialog box will open. Select ASP.NET from the left panel, then select “Web API Controller Class” from templates panel and put the name as EmployeeController.cs. Press OK.
This will create our Web API EmployeeController class. We will put all our business logic in this controller. We will call the methods of EmployeeDataAccessLayer to fetch data and pass on the data to the Angular frontend.
Open EmployeeController.cs file and put the following code into it.


using System;
using System.Collections.Generic;
using System.Linq;
using System.Threading.Tasks;
using CrudInAngular5With.NetCore2.Models;
using Microsoft.AspNetCore.Mvc;

// For more information on enabling Web API for empty projects, visit https://go.microsoft.com/fwlink/?LinkID=397860

namespace CrudInAngular5With.NetCore2.Controllers
{
   
   public class EmployeeController : Controller
   {
EmployeeDataAccessLayer objemployee = new EmployeeDataAccessLayer();

[HttpGet]
[Route("api/Employee/Index")]
public IEnumerable Index()
{
return objemployee.GetAllEmployees();
}

[HttpPost]
[Route("api/Employee/Create")]
public int Create([FromBody] TblEmployee employee)
{
return objemployee.AddEmployee(employee);
}

[HttpGet]
[Route("api/Employee/Details/{id}")]
public TblEmployee Details(int id)
{
return objemployee.GetEmployeeData(id);
}

[HttpPut]
[Route("api/Employee/Edit")]
public int Edit([FromBody]TblEmployee employee)
{
return objemployee.UpdateEmployee(employee);
}

[HttpDelete]
[Route("api/Employee/Delete/{id}")]
public int Delete(int id)
{
return objemployee.DeleteEmployee(id);
}

[HttpGet]
[Route("api/Employee/GetCityList")]
public IEnumerable Details()
{
return objemployee.GetCities();
}
}
}


Create the Angular Service

We will create an Angular service which will convert the Web API response to JSON and pass it to our component. Right click on ClientApp/app folder and then Add >> New Folder and name the folder as Services.
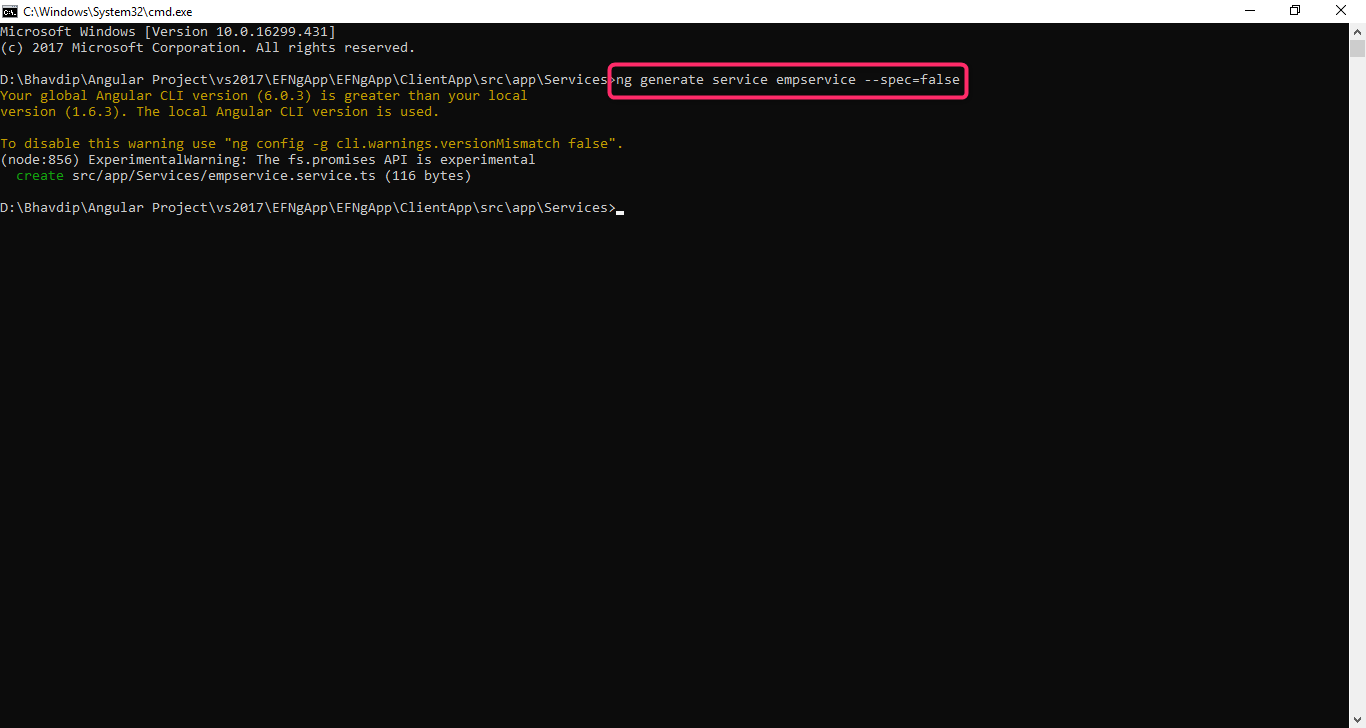
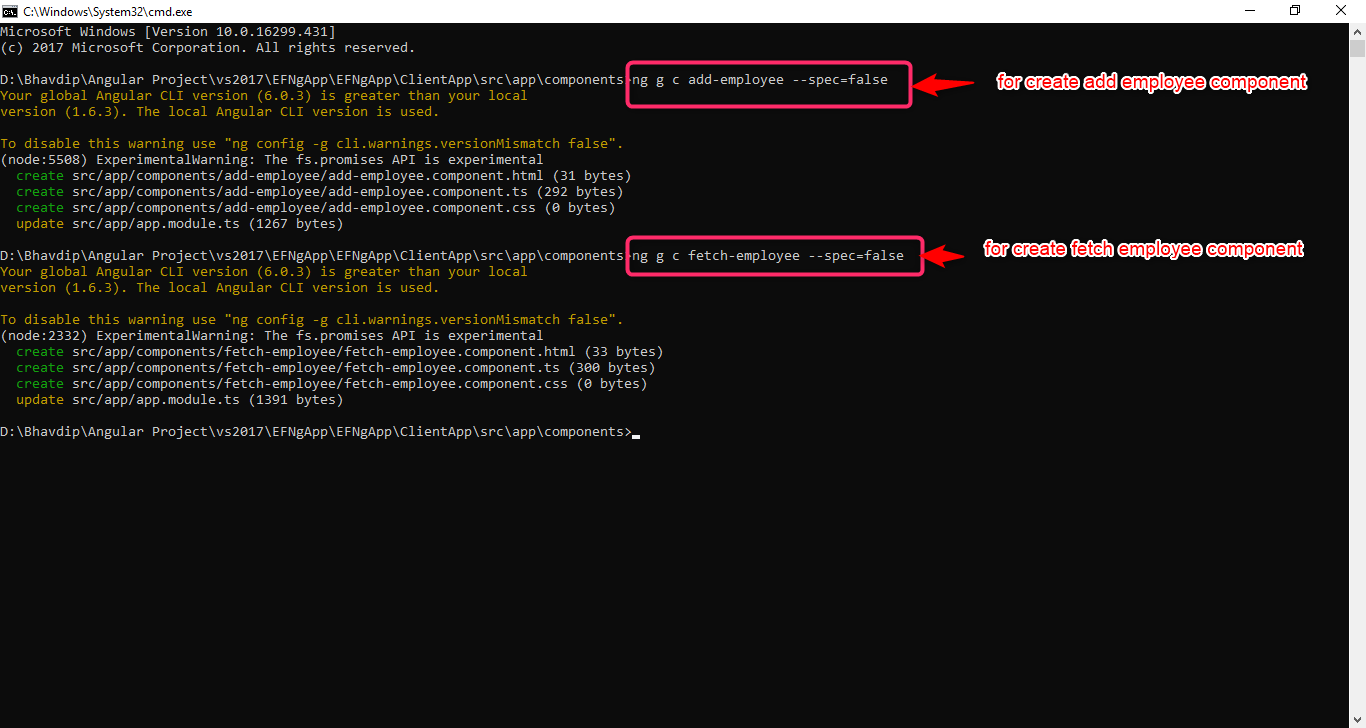
  • Now open the command prompt and write the command for the make the new service using the CLI
Ng generate service empservice --spec=false


--spec=false that mean do not create spec.ts file because i don't need to that file.
Open empservice.service.ts file and put the following code into it.
import { Injectable, Inject } from '@angular/core';  
import { Http, Response } from '@angular/http';  
import { Observable } from 'rxjs/Observable';  
import { Router } from '@angular/router';  
import 'rxjs/add/operator/map';  
import 'rxjs/add/operator/catch';  
import 'rxjs/add/observable/throw';  
 
@Injectable()  
export class EmployeeService {  
   myAppUrl: string = "";  
 
   constructor(private _http: Http, @Inject('BASE_URL') baseUrl: string) {  
       this.myAppUrl = baseUrl;  
   }
 
   getCityList() {  
       return this._http.get(this.myAppUrl + 'api/Employee/GetCityList')  
           .map(res => res.json())  
           .catch(this.errorHandler);  
   }
 
   getEmployees() {  
       return this._http.get(this.myAppUrl + 'api/Employee/Index')  
           .map((response: Response) => response.json())  
           .catch(this.errorHandler);  
   }
 
   getEmployeeById(id: number) {  
       return this._http.get(this.myAppUrl + "api/Employee/Details/" + id)  
           .map((response: Response) => response.json())  
           .catch(this.errorHandler)  
   }
 
   saveEmployee(employee) {  
       return this._http.post(this.myAppUrl + 'api/Employee/Create', employee)  
           .map((response: Response) => response.json())  
           .catch(this.errorHandler)  
   }
 
   updateEmployee(employee) {  
       return this._http.put(this.myAppUrl + 'api/Employee/Edit', employee)  
           .map((response: Response) => response.json())  
           .catch(this.errorHandler);  
   }
 
   deleteEmployee(id) {  
       return this._http.delete(this.myAppUrl + "api/Employee/Delete/" + id)  
           .map((response: Response) => response.json())  
           .catch(this.errorHandler);  
   }
 
   errorHandler(error: Response) {  
       console.log(error);  
       return Observable.throw(error);  
   }
}  

Creating Angular Components

Make the Newfolder in to Clientapp/src/app give the name  : Components
We will be adding two Angular components to our application: -
  1. fetchemployee component - to display all the employee data and delete an existing employee data.
  2. addemployee component - to add a new employee data or edit an existing employee data.


Now open cmd with your component directory and write command like that
ng g c add-employee --spec=false
After complete process of this command then write command for the fetch-employee component
ng g c fetch-employee --spec=false


g=generate
c=component


Now our ClientApp/app/components will look like the image below:

Now open add-employee.component.ts file and put the following code into it:


import { Component, OnInit } from '@angular/core';
import { Http, Headers } from '@angular/http';
import { NgForm, FormBuilder, FormGroup, Validators, FormControl } from '@angular/forms';
import { Router, ActivatedRoute } from '@angular/router';
import { FetchEmployeeComponent } from '../fetch-employee/fetch-employee.component';
import { EmpserviceService } from '../../services/empservice.service';

@Component({
 selector: 'app-add-employee',
 templateUrl: './add-employee.component.html',
 styleUrls: ['./add-employee.component.css']
})

export class AddEmployeeComponent implements OnInit {
 employeeForm: FormGroup;
 title: string = "Create";
 employeeId: number;
 errorMessage: any;
 cityList: Array = [];

 constructor(private _fb: FormBuilder, private _avRoute: ActivatedRoute,
   private _employeeService: EmpserviceService, private _router: Router) {
   if (this._avRoute.snapshot.params["id"]) {
     this.employeeId = this._avRoute.snapshot.params["id"];
   }

   this.employeeForm = this._fb.group({
     employeeId: 0,
     name: ['', [Validators.required]],
     gender: ['', [Validators.required]],
     department: ['', [Validators.required]],
     city: ['', [Validators.required]]
   })
 }

 ngOnInit() {

   this._employeeService.getCityList().subscribe(
     data => this.cityList = data
   )

   if (this.employeeId > 0) {
     this.title = "Edit";
     this._employeeService.getEmployeeById(this.employeeId)
       .subscribe(resp => this.employeeForm.setValue(resp)
         , error => this.errorMessage = error);
   }

 }

 save() {

   if (!this.employeeForm.valid) {
     return;
   }

   if (this.title == "Create") {
     this._employeeService.saveEmployee(this.employeeForm.value)
       .subscribe((data) => {
         this._router.navigate(['/fetch-employee']);
       }, error => this.errorMessage = error)
   }
   else if (this.title == "Edit") {
     this._employeeService.updateEmployee(this.employeeForm.value)
       .subscribe((data) => {
         this._router.navigate(['/fetch-employee']);
       }, error => this.errorMessage = error)
   }
 }

 cancel() {
   this._router.navigate(['/fetch-employee']);
 }

 get name() { return this.employeeForm.get('name'); }
 get gender() { return this.employeeForm.get('gender'); }
 get department() { return this.employeeForm.get('department'); }
 get city() { return this.employeeForm.get('city'); }
}  


This component will be used for both adding and editing the employee data.
Now Open add-employee.component.html file and put the following code into it:

{{title}}


Employee


"employeeForm" (ngSubmit)="save()" #formDir="ngForm" novalidate>  
 
   
class="form-group row">  
         
       
class="col-md-4">  
           class="form-control" type="text" formControlName="name">  
       
       class="text-danger" *ngIf="name.invalid && formDir.submitted">  
           Name is required.  


class="form-group row">  
         
       
class="col-md-4">  


       class="text-danger" *ngIf="gender.invalid && formDir.submitted">  
           Gender is required  


class="form-group row">  
         
       
class="col-md-4">  
           class="form-control" type="text" formControlName="department">  
       
       class="text-danger" *ngIf="department.invalid && formDir.submitted">  
           Department is required  


class="form-group row">  
         
       
class="col-md-4">  


                       value={{city.cityName}}>  
                   {{city.cityName}}


       class="text-danger" *ngIf="city.invalid && formDir.submitted">  
           City is required  


class="form-group">  


Open fetch-employee.component.ts file and put the following code to it:
import { Component, Inject } from '@angular/core';
import { Http, Headers } from '@angular/http';
import { Router, ActivatedRoute } from '@angular/router';
import { EmpserviceService } from '../../services/empservice.service'

@Component({
 selector: 'app-fetch-employee',
 templateUrl: './fetch-employee.component.html',
 styleUrls: ['./fetch-employee.component.css']
})

export class FetchEmployeeComponent {
 public empList: EmployeeData[];

 constructor(public http: Http, private _router: Router, private _employeeService: EmpserviceService) {
   this.getEmployees();
 }

 getEmployees() {
   this._employeeService.getEmployees().subscribe(
     data => this.empList = data
   )
 }

 delete(employeeID) {
   var ans = confirm("Do you want to delete customer with Id: " + employeeID);
   if (ans) {
     this._employeeService.deleteEmployee(employeeID).subscribe((data) => {
       this.getEmployees();
     }, error => console.error(error))
   }
 }
}

interface EmployeeData {
 employeeId: number;
 name: string;
 gender: string;
 city: string;
 department: string;

}  


Open fetch-employee.component.html file and put the following code to it:


Employee Data


This component demonstrates fetching Employee data from the server.


Loading...

   Create New


EmployeeId
           
Name
           
Gender
           
Department
           
City


{{ emp.employeeId }}
           
{{ emp.name }}
           
{{ emp.gender }}
           
{{ emp.department }}
           
{{ emp.city }}
           
           
               Edit |
               Delete


Defining route and navigation menu for our Application

Now add the path of your component in app.module.ts file
Open app.module.ts file and put the following code to it:
import { BrowserModule } from '@angular/platform-browser';
import { NgModule } from '@angular/core';
import { FormsModule, ReactiveFormsModule } from '@angular/forms';

import { HttpClientModule, HttpClient } from '@angular/common/http';
import { HttpModule } from '@angular/http';

import { RouterModule } from '@angular/router';


import { AppComponent } from './app.component';
import { NavMenuComponent } from './nav-menu/nav-menu.component';
import { HomeComponent } from './home/home.component';
import { CounterComponent } from './counter/counter.component';
import { FetchDataComponent } from './fetch-data/fetch-data.component';
import { AddEmployeeComponent } from './Components/add-employee/add-employee.component';
import { FetchEmployeeComponent } from './Components/fetch-employee/fetch-employee.component';
import { EmpserviceService } from './empservice.service';


@NgModule({
 declarations: [
   AppComponent,
   NavMenuComponent,
   HomeComponent,
   CounterComponent,
   FetchDataComponent,
   AddEmployeeComponent,
   FetchEmployeeComponent
 ],
 
 imports: [
   BrowserModule.withServerTransition({ appId: 'ng-cli-universal' }),
   HttpClientModule,
   HttpModule,
   FormsModule,
   ReactiveFormsModule,

   RouterModule.forRoot([
     { path: '', component: HomeComponent, pathMatch: 'full' },
     { path: 'home', component: HomeComponent },
     { path: 'fetch-employee', component: FetchEmployeeComponent },
     { path: 'add-employee', component: AddEmployeeComponent },
     { path: 'employee/edit/:id', component: AddEmployeeComponent },
     { path: '**', redirectTo: 'home' }  


   ])
 ],
 providers: [EmpserviceService],
 bootstrap: [AppComponent]
})
export class AppModule { }


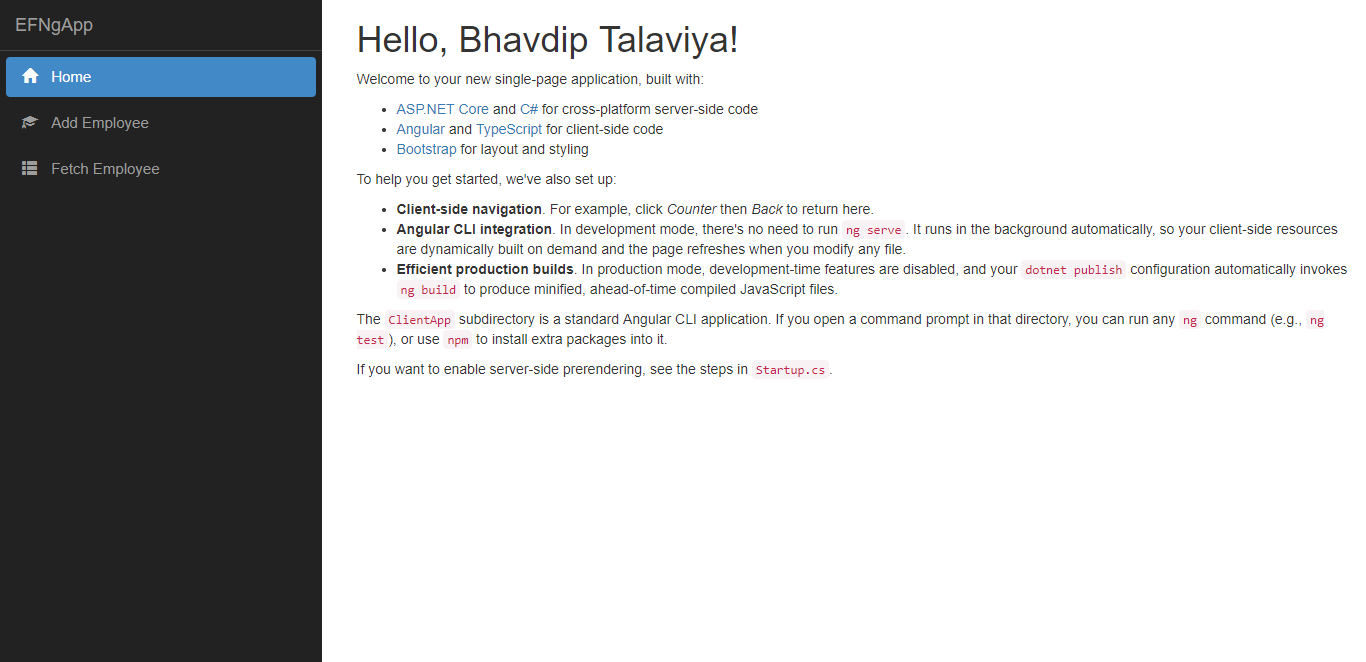
Here we have also imported all our components and defined the route for our application as below
  • home - which will redirect to home component
  • fetch-employee - to display all employee data using fetch-employee component
  • add-employee - to add new employee record using add-employee component
  • employee/edit/:id - to edit existing employee record using add-employee component
One last thing is to define navigation menu for our application. Open /app/components/navmenu/navmenu.component.html file and put the following code to it


               Toggle navigation


           EFNgApp


  •                    
                            Home


  •                    
                            Add Employee


  •                  
                        Fetch employee


    Run your application

    Press F5 to launch the application.


    Now insert employee data with proper validation.

    Source Code

    Before proceeding I would recommend you to get the source code from Github.

    Conclusion


    We have successfully created an ASP.NET Core 2.1 application using Angular 5 and Entity Framework core database first approach with the help of Visual Studio 2017 and SQL Server 2012.

    3:43 AM by Dilip kakadiya · 0