Friday, October 21, 2011
N-Tier development with ASP.NET MVC, WCF, and LINQ
Download code
Introduction
This article is about a possible way to implement an N-Tier architecture for ASP.NET MVC (Model View Controller), using WCF (Windows Communication Foundation = replacement for .NET Remoting) and LINQ to SQL. This article will not go in depth explaining the ins and outs of MVC, WCF, and LINQ (there's already enough stuff which explains these technologies ...); instead, I'll be showing a possible way to implement these features in an N-Tier environment, by means of a simple bug-tracking demo application.
Requirements of the Bug-Tracking Demo Application
First, we should state the requirements of our demo application. These are quit straightforward, as mentioned beneath:
- We want the application to produce a list of currently added bug-tracking tickets.
- We want the possibility that a user can add a ticket to the system, which evolves adding a ticket date, selecting a user to whom we grant the ticket, adding a ticket date, and letting the user add some comments.
- Before adding a new ticket to the system, we want to be sure that the user has supplied a valid date, selected a ticket type and user, and added some comments for the ticket.
Architectural Overview
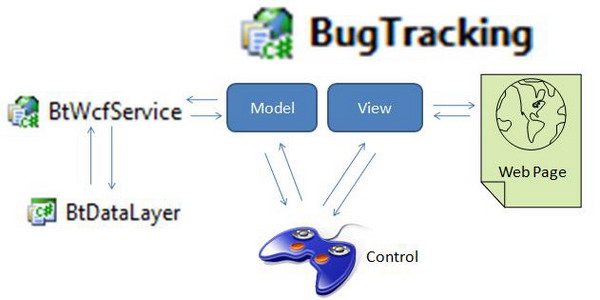
The .NET Solution consists of three main projects:
- BtDataLayer: Contains the model classes and the data access routines.
- BtWcfService: Contains the services which the presentation layer may call.
- BugTracking: Contains the presentation layer (ASP.NET MVC app).
Another project not mentioned on the diagram above is CommonLib, which contains the commonly used routines (like a business base class which each model class derives from, method for cloning objects, and a business rule validator engine).
Using the Code
The Data Access Layer (BtDataLayer)
- The model classes (BugTracker.dbml):
- The Data Access Code (btDataManger.cs):
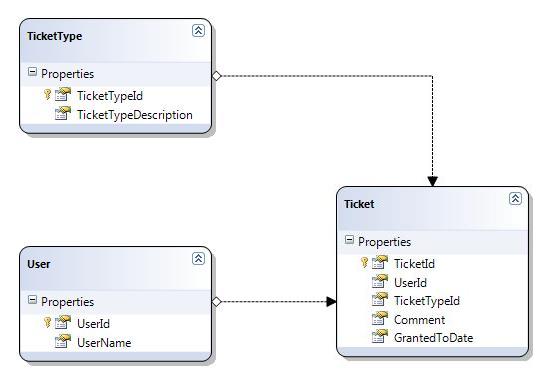
These are the LINQ-TO-SQL classes retrieved from the SQL-Server Bugtracker database (database template included in the Zip file). As this model should be remotable, the serialization mode on the datacontext should be set to Unidirectional.
We want to be able to load a user-list so we can select a user for whom the ticket applies to:
public static List<user> GetUserList()
{
// Create the DataContext to retrieve the Users from.
BugTrackerDataContext db = new BugTrackerDataContext();
// Return a list of Users.
return db.Users.ToList<user>();
}
We want to be able to load a tickettype list, so we can select the type of ticket (BUG, INFO, etc ...) for the ticket:
Collapse | Copy Code
public static List<tickettype> GetTicketTypeList()
{
// Create the DataContext to retrieve the Ticket Types from.
BugTrackerDataContext db = new BugTrackerDataContext();
// Return a list of TicketTypes.
return db.TicketTypes.ToList<tickettype>();
}
We want to be able to retrieve all the current tickets from our ticket table:
Collapse | Copy Code
public static IEnumerable<ticket> GetTickets()
{
// Create the DataContainer to retrieve the tickets.
BugTrackerDataContext db = new BugTrackerDataContext();
// Return a List of Tickets
return db.Tickets;
}
Finally, we want to have the possibility to persist a newly added ticket (one at a time for the demo application, but we make the method all-purpose, so it can accept many added or modified objects):
Collapse | Copy Code
public static bool PersistTickets(ref TicketList p_tickets)
{
// Only persist if any tickets to add or modify.
if (p_tickets == null || p_tickets.Count == 0)
return false;
// Create the persistence datacontext
BugTrackerDataContext db = new BugTrackerDataContext();
// Persist any new or modified tickets.
foreach (Ticket t in p_tickets)
{
if (t.TicketId == 0)
{
db.Tickets.InsertOnSubmit(t);
}
else
{
db.Tickets.Attach(t, t.IsDirty);
}
}
try
{
db.SubmitChanges(ConflictMode.ContinueOnConflict);
// Reset the isDirty flag.
foreach (Ticket t in p_tickets)
{
t.IsDirty = false;
}
}
catch (ChangeConflictException ex)
{
throw ex;
}
return true;
}
The Service Layer
The purpose of our WCF enabled service layer is to make the model and data-access routines (to foresee the model of data ...) available to the presentation layer.
Our service layer consists mainly of two routines:
The service contract (which contains the routines which can be called by our Web App).
Collapse | Copy Code
[ServiceContract]
public interface IBtService
{
[OperationContract()]
IEnumerable<user> GetUserList();
[OperationContract()]
IEnumerable<tickettype> GetTicketTypeList();
[OperationContract()]
bool PersistTickets(ref TicketList p_tickets);
[OperationContract()]
IEnumerable<ticket> GetTickets();
}
The Service Implementation, which implements our contract and calls the datalayer.
Collapse | Copy Code
public IEnumerable<user> GetUserList()
{
return BtDataManager.GetUserList();
}
public IEnumerable<tickettype> GetTicketTypeList()
{
return BtDataManager.GetTicketTypeList();
}
public bool PersistTickets(ref TicketList p_tickets)
{
return BtDataManager.PersistTickets(ref p_tickets);
}
public IEnumerable<ticket> GetTickets()
{
return BtDataManager.GetTickets();
}
The Presentation Layer
The presentation layer contains our ASP MVC application. As already mentioned above, I will not go in depth on MVC, as there is already a lot of info available on the net. But it is important to know that MVC contains three main items, namely the Model (which represents our class, a validation logic, and is remotely available through the Service Layer), the View (our webpage), and the Controller (which basically "hooks" the Model to the View).
The Views and the Controllers
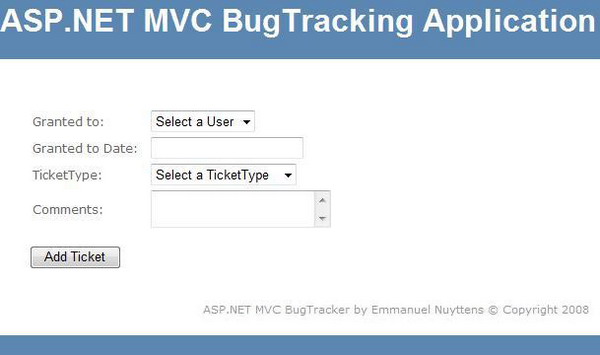
With this page, the user can add a bug-ticket to the system. The HomeController is responsible for rendering the page. While interacting with the page, there are two actions involved, one for creating a new ticket (the "GET") version, and one for persisting a new ticket (when the user hits the Submit button: the POST version).
[AcceptVerbs("GET")]
public ActionResult Ticket()
{
this.LoadSelectionLists();
// Get the userlist
var userList = new SelectList(_userList, "UserId", "Username");
ViewData["UserId"] = userList;
// Get the tickettypelist
var ticketTypeList = new SelectList
(_ticketTypeList, "TicketTypeId", "TicketTypeDescription");
ViewData["TicketTypeId"] = ticketTypeList;
return View();
}
When the user selects "Create Ticket" in the index page, we must create a new page where the user may enter the ticket details. As the user should have the possibility to select a user and ticket type for the ticket, these data are loaded from the service and added to the viewstate of the form:
Collapse | Copy Code
private void LoadSelectionLists()
{
// Get a proxy to the data service provider
BtServiceRef.BtServiceClient proxy = new
BugTracking.BtServiceRef.BtServiceClient();
// Get the userlist
_userList = proxy.GetUserList();
// Get the tickettypelist
_ticketTypeList = proxy.GetTicketTypeList();
}
On the other hand, the post version is executed when the user hits the "Submit" button. We will create a ticket object, map the properties to the field properties of the form, validate the objects data (see the source code of the model for detailed validation information as validation data is stored in the model classes), and persist the newly added ticket through the service to the database.
Collapse | Copy Code
[AcceptVerbs("POST")]
public ActionResult Ticket(FormCollection p_form)
{
// Create placeholder for the ticket to add.
var TicketToCreate = new Ticket();
try
{
// Map the controls of the View to the PlaceHolder.
this.UpdateModel(TicketToCreate, new[]
{ "UserId", "TicketTypeId", "Comment", "GrantedToDate" });
// Force Validation
TicketToCreate.Validate();
// First check if any validation Errors Exist on the newly
added ticket
if (TicketToCreate.HasErrors)
{
// View Validation Errors
foreach(DictionaryEntry entry in
TicketToCreate.ValidationErrors)
{
ViewData.ModelState.AddModelError(entry.Key.ToString
(), entry.Value.ToString());
}
throw new InvalidOperationException();
}
else
{
// Create the WCF Remote service and let the service
persist the new ticket.
BtServiceRef.BtServiceClient proxy = new
BugTracking.BtServiceRef.BtServiceClient();
Ticket[] newTicketList = new Ticket[] { TicketToCreate };
proxy.PersistTickets(ref newTicketList);
}
}
catch
{
this.LoadSelectionLists();
var userList = new SelectList(_userList, "UserId", "Username");
ViewData["UserId"] = userList;
var ticketTypeList = new SelectList
(_ticketTypeList, "TicketTypeId", "TicketTypeDescription");
ViewData["TicketTypeId"] = ticketTypeList;
// Show possible validation errors.
return View(TicketToCreate);
}
// Return to main page.
return RedirectToAction("Index");
}
There are two comboboxes on the ticket.aspx form: one for user selection and one for ticket type selection. As shown in the code above, we load the user and ticket type records from the service and add them as ViewData of the ticket page. Next, we have to bind the ViewData as mentioned below (you can also notice how we execute the bindings for validation purpose):
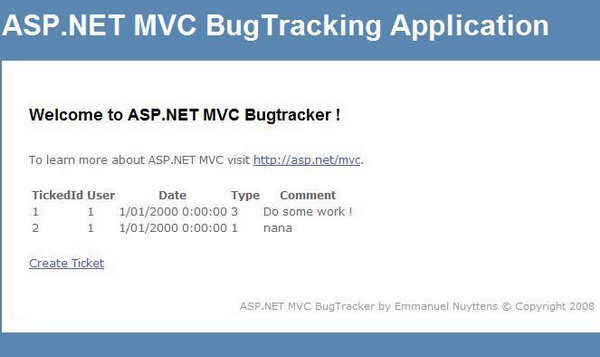
Index.aspx
When loading the application in the browser, the index page is the first page shown. We get a list of current tickets in the database and the possibility to add a new ticket to the system:
Again, the HomeController is responsible for rendering the page, the action involved is:
Collapse | Copy Code
public ActionResult Index()
{
ViewData["Title"] = "Home Page";
ViewData["Message"] = "Welcome to ASP.NET MVC Bugtracker !";
// Create a proxy to the WCF service.
BtServiceRef.BtServiceClient proxy =
new BugTracking.BtServiceRef.BtServiceClient();
// Get all tickets from the DataLayer.
return View(proxy.GetTickets());
}
As we will show the current tickets in this page, we first create a reference to our service. This service calls the GetTickets() method of our data layer data-access class and adds it as input parameter of the view. Next, to be sure that our Index Page is aware of the loaded ticket-list, the BtDataLayer.Ticket type should be added as an attribute to the derived ViewPage:
Finally, in the HTML code of our index.aspx page, we can loop through our loaded ticket list and place each ticket in a data row:
You may have noticed that I display the UserId and TickeTypeId instead of the user name and ticket type description. If you want to view, for example, the username instead of the ID, you should use: t.User.UserName, but this will return an error, as the user is not loaded with the tickets. You can change this by altering the data access method and adding data load options for the user and ticket type. In this case, the related user and ticket type objects will be loaded too.
