Wednesday, November 9, 2011
ASP.NET Menu and SiteMap Security Trimming
Summary
ASP.NET 2005 introduced a pretty solid menu which is integrated with a configuration driven sitemap. The cool part is that the menu can be hooked in with your security roles, so you don't have to worry about hiding or showing menu options based on the user - the menu options are automatically kept in sync with what the user is allowed to see. We'll talk about how to set this up, using an example from a website I worked on recently.
If you're familiar with ASP.NET sitemaps and menus, skip to the end to read a trick for working around cases when you want to do something more complex, such as have a page to be accessible to a user role, but not to show up in the menu.
The Video.Show site was originally planned to have only one class of user, with no user restrictions other than requiring a quick registration before commenting on videos or uploading videos. With that being the case, we just included a static menu in the masterpage, defined as <asp:MenuItem> elements. As we were gearing up for the first beta release, it became obvious that our user model was too simple. Hosted installations would probably want to allow users to register and begin commenting right away, not give all these users upload rights. That implied four classes of user now: unauthenticated, commenter, uploader, and also administrator (implied by the requirement to manage multiple user classes). That meant role management and new menu items to be kept in sync - the right time to move to a sitemap driven menu with security trimming.
Step One - Define The Sitemap
I'm using a static sitemap defined in a Web.sitemap file, and it's especially simple since there's no is no hierarchy involved. This uses the default XmlSiteMapProvider; there are other sitemap providers available on the internets, such as a SQL Sitemap Provider for database driven site structure, or you can implement your provider if you've got a custom situation.
<?xml version="1.0" encoding="utf-8" ?>
<siteMap xmlns="http://schemas.microsoft.com/AspNet/SiteMap-File-1.0" >
  <siteMapNode roles="*">
    <siteMapNode title="Home" url="~/Default.aspx" />
    <siteMapNode title="Videos" url="~/Tags.aspx" />
    <siteMapNode title="Members" url="~/MemberList.aspx" />
    <siteMapNode title="My Page" url="~/MyPage.aspx" />
    <siteMapNode title="My Recent Views" url="~/RecentViews.aspx" />
    <siteMapNode title="Upload a Video" url="~/Upload.aspx" />
    <siteMapNode title="Administer Users" url="~/AdministerUsers.aspx" />
  </siteMapNode>
</siteMap>
Note that the IntelliSense for a .sitemap file is misleading:
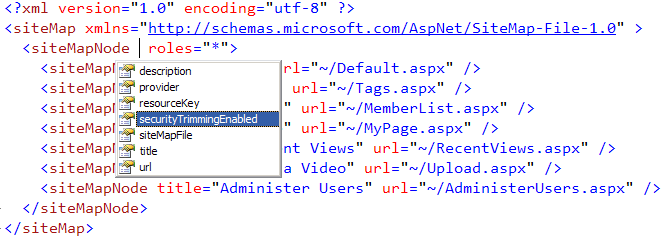
While the XSD for .sitemap files (from which the IntelliSense is derived) includes "securityTrimmingEnabled" attribute, it's incorrect. It's the result of an old VS 2005 bug that's still around. That value should be set in web.config; we'll take care of that next.
Step Two - Declare The Sitemap in web.config
A few things to notice here:
- I define the provider type as System.Web.XmlSiteMapProvider
- I specify the siteMapFile as the Web.sitemap file we've just discussed
- I set securityTrimmingEnabled="true"
<siteMap enabled="true">
  <providers>
    <clear/>
    <add siteMapFile="Web.sitemap" name="AspNetXmlSiteMapProvider" type="System.Web.XmlSiteMapProvider" securityTrimmingEnabled="true"/>
  </providers>
</siteMap>
This is really just overriding the default sitemap settings from %windir%\Microsoft.NET\Framework\v2.0.50727\CONFIG\web.config, which also uses the name AspNetXmlSiteMapProvider, but which doesn't include security trimming.
Step Three - Set required roles for the pages
This section of the web.config looks long, but you'll see it very repetitive. MSDN's information on setting up authorization rules is pretty well written, so take a look there if you'd like more info. The high points:
- Rules are processed top to bottom. For example in the Upload.aspx case, a user in the Uploader role is allowed right off the bat, everyone else is denied.
- Pages which are displayed to all authenticated users just need to deny unauthenticated users, like this: <deny users=?">
- There's no wildcard for roles, so you can't say something like <allow roles="*">.
- Role based permissions is configured by default in machine.config (using both AspNetSqlRoleProvider and AspNetWindowsTokenRoleProvider). The Sql Role Provider assumes a database connectionstring named LocalSqlServer, so if your profile information is stored somewhere else you'll need to make sure the rolemanager is configured correctly.
<location path="Upload.aspx">
  <system.web>
    <authorization>
      <allow roles="Uploader"/>
      <deny users="*" />
    </authorization>
  </system.web>
</location>
<location path="Profile.aspx">
  <system.web>
    <authorization>
      <deny users="?" />
    </authorization>
  </system.web>
</location>
<location path="MyPage.aspx">
  <system.web>
    <authorization>
      <deny users="?" />
    </authorization>
  </system.web>
</location>
<location path="RecentViews.aspx">
  <system.web>
    <authorization>
      <deny users="?" />
    </authorization>
  </system.web>
</location>
<location path="AdministerUsers.aspx">
  <system.web>
    <authorization>
      <allow roles="Administrator"/>
      <deny users="*"/>
    </authorization>
  </system.web>
</location>
Step Four - Add A Sitemap Data Source and a Menu to your Master Page
<asp:SiteMapDataSource runat="server" ID="siteMapDataSource" ShowStartingNode="false" />
<asp:Menu runat="server" ID="MainMenu" Orientation="Horizontal" DataSourceID="siteMapDataSource" />
You'll probably want to style the menu, too. I'm a fan of the CSS Friendly Control Adapters, which changes the HTML output to use clean UL. Without the Control Adapter, the Menu control outputs nested tables manipulated by JavaScript. Here's what the above menu looks like for a user who's logged in but isn't in the Administrator or Uploader roles:

The Payoff - Everything is Managed In One Place
That may seem like a lot to configure, and you might be wondering if it isn't easier to just write write your own code to handle access and menu management.
First off, the above actually goes pretty quickly - hopefully this post or others I've linked to make it a little faster.
Secondly, the real payoff is that you've now got a reliable, maintainable solution to controlling page access, and it's all automatically kept in sync. Let's say we want to add a new page that's only visible to users with Uploader rights - maybe a page (MyVideos.aspx) where they can edit or delete videos they've previously uploaded. I'd only need to add one page to the sitemap file, set the access rule in web.config to allow Uploaders and deny everyone else, and the page will only show up in the menu when an Uploader has logged in. This is a good application of the Don't Repeat Yourself philosophy. We don't have one set of logic determining what pages users are allowed to view and another set which determines what pages they should see in the menu; these are both the same list and should be handled that way.
Tip - Use a Url Mapping to alias pages when your access and menu visibility are more complex
I wanted to point out one other tip that came in handy here. Before we realized the need for different user types, we had one page called Member.aspx, which served two purposes. If the querystring contained some other user's userid, it would show their public profile and a list of their videos. We also repurposed it as My Page, determined by navigating to the page as a logged in user without using a querystring.
When we hooked up the menu and page access, we had a problem. We only wanted to show My Page in the menu when a user was logged in, but we needed the Member.aspx page to be viewable by anonymous users, because it was used for public user profiles, too. The simple solution was to set up a Url Mapping which created a virtual MyPage.aspx (mapped to Member.aspx). Now we could set different access rights to MyPage.aspx and Member.aspx, as shown in the Step Three code sample - Member.aspx is public, and MyPage.aspx requires authentication. Here's how the Url Mapping was set up:
<urlMappings>
  <add url="~/MyPage.aspx" mappedUrl="~/Member.aspx"/>
</urlMappings>
